Whereas the Winnebago started out with every comfort and convenience you could ever think of, the Lynnebago started its camper van adventures in a very minimal way (with my future plan to add features when they’re truly wanted and needed).
I wanted to bring the Lynnebago to the upcoming Midwest T@B Rally in Iowa, but that didn’t leave me with much time to get the new van ready for camping. But I still had a few days to order some items online and run around to the local outdoors stores to fill in the gaps of my old tent camping gear that had been waiting patiently in the garage the past couple of years.
The weather in Iowa was absolutely perfect for camping—daytime highs in the low 70’s and evening lows in the upper 50’s. No need for air conditioning, and a good thing, too, because I don’t yet have one! Since my site had an electric hook-up, I did bring a small Pelonis ceramic heater, but only needed it one morning. It managed to heat the van up within a few minutes on its low setting.
While I managed to get the old grungy roof vent replaced with the new Fantastic Fan, I ran out of time to get the electrical connected to it. So, I just brought my old Eureka 12 volt tent fan and hung it from a ceiling hook to provide ventilation. That was helped with 2 new screened window louvers that I got from EuroCampers.com. These worked great to provide air flow inside the van (while keeping most of the bugs outside).
I got a very comfortable, lightweight, army-style cot at Gander Mountain that worked out well and bungeed securely to the van’s tie-down loops. At 20” high, it was tall enough to stow lots of stuff beneath it (i.e. my plastic storage tubs of food, cooking supplies, an empty 7 gallon water jug, and my porta-potti), and yet the cot was still low enough to sit on as a sofa.
I added my self-inflating camp mattress, my heavenly Big Agnes Clearview air pad (cooler and more comfortable than memory foam), and my twin-sized Travasak (oversized sleeping bag with real sheets). It made for a bed more comfortable than what I had in the View, and even a bit better than my real mattress at home!
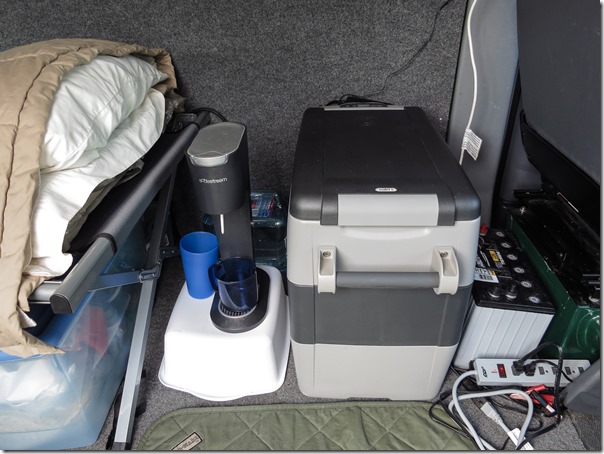
My kitchen was split between indoor and outdoor spaces. On the inside, I bought a new cooler-style Danfoss compressor refrigerator that runs very quietly and efficiently on battery or electric (an Indel B 51 litre). It can run low enough to be a freezer, so I figured it will be able to serve double-duty at home too. It stored quite a bit of food and ran extremely quietly.
Next to the fridge, was a new 12-volt Duracell AGM Group 31 battery that I bought from Sam’s Club. As I only have one 12-volt outlet at the dash (that I already use for my GPS and iPhone), I thought a separate “house” battery would be better to use for the fridge when traveling.
I brought an extra dishpan and extra 2 gallon water dispenser to use inside, but never really needed them, so next time will leave them at home. Used more often was my 4 gallon blue water jug. When standing outside at the sliding door, the floor of the van made a convenient kitchen prep area and place to keep the water jug.
For cooking, I bought a new LP camp stove, a Campchef Sierra, that worked wonderfully to boil water in no time with it’s higher-output burners.
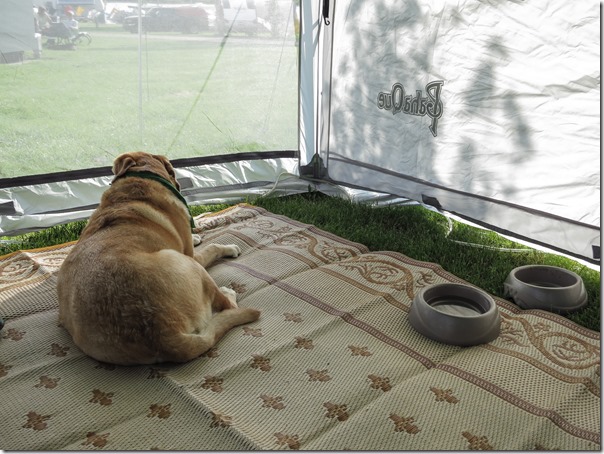
The biggest addition to my Lynnebago camping experience was my new 10x10 PahaQue Screenroom tent (shown in the first picture above with the side wall awnings rolled down). This more than doubled our living space and Millie found it to be a delightful “dog house” to snooze in while I went off to kayak.
The screenroom packs down into a small and relatively light weight 23 lbs (less than half the size and weight of a scissor-style “EZ-Up” shelter). While the smaller size is perfect, the jury is still out on whether I’ll use this often in the future. It was impossible for me to set up on my own and I had to recruit a couple from the neighboring campsite to help hold poles and get it standing upright. Once it was up, it was wonderful to have, and the side walls and rainfly worked great to keep the rain out on Saturday night. It was also very easy for me to disassemble and pack away on my own.
I think it will be most useful in the future if I intend to “base camp” at the same site for a few nights and be off sightseeing in the daytime. Having this screenroom up will clearly show others that my campsite is “occupied” even when my van’s not there. But if I’m in hyper-travel mode staying at a different place each night, I’ll likely find a roll-out awning (attached to the side of the van) more useful.
Other random observations from my first camping trip:
- I bungeed a cargo net across the stuff in the back of the van (miscellaneous small camping & paddling gear, my extra leveling blocks, shoes, tote bag, duffle bag of clothes, etc). I didn’t like having so many “unsecured” items on the floor, so know I’ll want some overhead cabinets and maybe a tall floor to ceiling storage closet too.
- Still not sure if I want a window behind the driver’s door (opposite the sliding door). While the added view and ventilation would be nice, I also liked the how nicely insulated the carpeted plywood wall was next to my bed.
- I need to get some nicer curtains made soon! For this first outing, I used the fabric shower curtain that came with the van to block off the cab from the rear living space, and then re-used some pieces or Reflectix to cover the rear and sliding door windows. Quite a “Hillbilly Hilton” look, but at least it provided the necessary privacy to sleep at night!
- Hated using the grungy campground showers (although my new $5 K-Mart flipflops sure did help!). I’ll need to start figuring out a way to rig up a portable shower of some kind.
- Really loved how peppy this van traveled now that it was not towing the Tracker! Driving 70 mph in wind, I still managed to get 20 MPG which is much better than the 12-13 MPG I’ve usually gotten with the View.
I’ll keep tinkering with the camping gear and layout for the next few camping trips until I settle into something that feels like it will stick long-term, then I’ll be ready for the walls and ceiling to be ripped out and the real solution to finally be built!
Any tips or suggestions from you van dweller or small-camper pros, please comment away!


